liziyu 发布的文章

批量替换mysql一个表中某个字段的值里面的部分字符串,使用mysql replace函数:

UPDATE prezzie_category SET image = REPLACE (image, 'http://localhost:8727','https://a.liziyu.com') where id > 0;

注意,操作之前请先备份表:

CREATE TABLE prezzie_category_bak AS SELECT * FROM prezzie_category;

Nginx反代

server
{
    listen 80;
    # 您的域名
    server_name cms.demo.mallray.com;
    # 索引文档,建议将 index.html 放在第一个
    index index.html

    #禁止访问的文件或目录
    location ~ ^/(\.user.ini|\.htaccess|\.git|\.svn|\.project|LICENSE|README.md|package.json|package-lock.json|\.env) {
        return 404;
    }


    # HTTP反向代理相关配置开始 >>>
    location / {
        # 端口为3000,自定义后请注意修改
        proxy_pass http://127.0.0.1:3000;
        proxy_set_header Host $host:$server_port;
        proxy_set_header X-Real-IP $remote_addr;
        proxy_set_header X-Forwarded-For $proxy_add_x_forwarded_for;
        proxy_set_header REMOTE-HOST $remote_addr;
        proxy_connect_timeout 30s;
        proxy_read_timeout 86400s;
        proxy_send_timeout 30s;
        proxy_redirect off;
    }
    # HTTP反向代理相关配置结束 <<<

    # 有可能会存在的默认规则-【请删除它们】,否则很多资源会404 - START
    location ~ .*\.(gif|jpg|jpeg|png|bmp|swf)$
    {
        expires      30d;
        error_log /dev/null;
        access_log /dev/null;
    }

    location ~ .*\.(js|css)?$
    {
        expires      12h;
        error_log /dev/null;
        access_log /dev/null;
    }
    # 有可能会存在的默认规则-【请删除它们】,否则很多资源会404 - END
}

使用面板

  1. 进入面板,打开网站管理,切换到 Node 项目,并添加 Node 项目
  2. 项目目录选择 web-nuxt 根目录
  3. 启动选项请选择 start
  4. 真实端口填写 3000
  5. 填写正确的绑定域名,宝塔将自动配置好代理
  6. 项目添加成功后,即可使用域名访问站点,并可以方便的配置 SSL 证书等

------------ js --------------

<script src="http://crypto-js.googlecode.com/svn/tags/3.0.2/build/rollups/hmac-sha256.js"></script>
<script src="http://crypto-js.googlecode.com/svn/tags/3.0.2/build/components/enc-base64-min.js"></script>

<script>
  var hash = CryptoJS.HmacSHA256("Message", "secret");
  var hashInBase64 = CryptoJS.enc.Base64.stringify(hash);
  document.write(hashInBase64);
</script>

------------- php ----------------

$s = hash_hmac('sha256', 'Message', 'secret', true);
echo base64_encode($s);

------------ go ------------------

func ComputeHmac256(message string, secret string) string {
    key := []byte(secret)
    h := hmac.New(sha256.New, key)
    h.Write([]byte(message))
    return base64.StdEncoding.EncodeToString(h.Sum(nil))
}

func main() {
    fmt.Println(ComputeHmac256("Message", "secret"))
}

通过网盘分享的文件:海康相关

链接: https://pan.baidu.com/s/1HFi-LUVvfEmJsSiNkX43Bg 提取码: 48y8

const wxuuid = function () {
  var s = [];
  var hexDigits = "0123456789abcdef";
  for (var i = 0; i < 36; i++) {
    s[i] = hexDigits.substr(Math.floor(Math.random() * 0x10), 1);
  }
  s[14] = "4"; // bits 12-15 of the time_hi_and_version field to 0010
  s[19] = hexDigits.substr((s[19] & 0x3) | 0x8, 1); // bits 6-7 of the clock_seq_hi_and_reserved to 01
  s[8] = s[13] = s[18] = s[23] = "-";
 
  var uuid = s.join("");
  return uuid
};
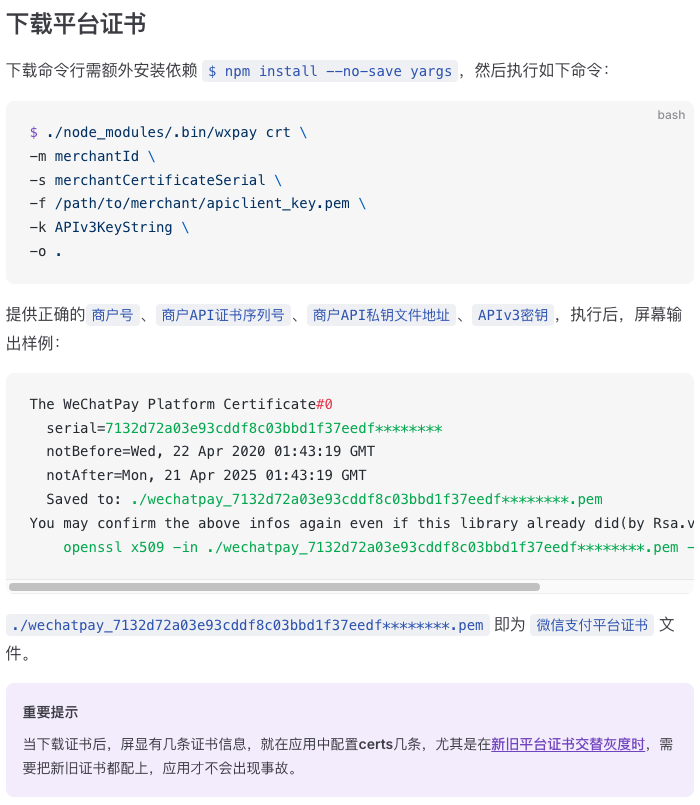
1. Vuex 状态管理

// store/index.js
import Vue from 'vue';
import Vuex from 'vuex';

Vue.use(Vuex);

export default new Vuex.Store({
  state: {
    cart: [] // 购物车数据
  },
  mutations: {
    addToCart(state, product) {
      state.cart.push(product);
    },
    removeFromCart(state, productId) {
      state.cart = state.cart.filter(item => item.id !== productId);
    },
    clearCart(state) {
      state.cart = [];
    }
  },
  getters: {
    cartItems: state => state.cart,
    cartTotal: state => state.cart.reduce((total, item) => total + item.price * item.quantity, 0),
  }
});

2. 本地存储(localStorage / uni.setStorage)

// 添加商品到购物车
function addToCart(product) {
  let cart = uni.getStorageSync('cart') || [];
  cart.push(product);
  uni.setStorageSync('cart', cart);
}

// 获取购物车数据
function getCart() {
  return uni.getStorageSync('cart') || [];
}

// 清空购物车
function clearCart() {
  uni.removeStorageSync('cart');
}

3. 在页面中使用 cartItems

<template>
  <view>
    <text>购物车商品列表:</text>
    <view v-for="item in cartItems" :key="item.id">
      <text>{{ item.name }} - {{ item.price }} (数量: {{ item.quantity }})</text>
    </view>
    <text>总价: {{ cartTotal }}</text>
  </view>
</template>

<script>
import { mapGetters } from 'vuex';

export default {
  computed: {
    ...mapGetters(['cartItems', 'cartTotal']), // 映射 Vuex getters
  },
  methods: {
    // 其他方法
  },
  mounted() {
    // 这里可以进行其他初始化操作
  }
};
</script>

<style scoped>
/* 添加你的样式 */
</style>

小结:mapGetters这是 Vuex 提供的一个辅助函数,可以让你在组件中方便地映射 Vuexgetters 到计算属性。通过这种方式,你可以直接使用 cartItemscartTotal 作为组件的计算属性。

创建 permission.js 文件:

//@unilts/permission.js

// 白名单
const whiteList = [
    '/', // 注意入口页必须直接写 '/'
    '/pages/tabbar/classify/classify', //分类
    '/pages/tabbar/cart/cart', //购物车
    {
        pattern: /^\/pages\/common\/*/
    } //支持正则表达式
];

export default async function() {
    const list = ['navigateTo', 'redirectTo', 'reLaunch', 'switchTab']
    // 用遍历的方式分别为,uni.navigateTo,uni.redirectTo,uni.reLaunch,uni.switchTab这4个路由方法添加拦截器
    list.forEach(item => {
        uni.addInterceptor(item, {
            invoke(e) {
                // 获取要跳转的页面路径(url去掉"?"和"?"后的参数)
                const url = e.url.split('?')[0]
                // 判断当前窗口是白名单,如果是则不重定向路由
                let pass
                if (whiteList) {
                    pass = whiteList.some((item) => {
                        if (typeof(item) === 'object' && item.pattern) {
                            return item.pattern.test(url)
                        }
                        return url === item
                    })
                }

                // 不是白名单并且没有token
                let token = uni.getStorageSync('Authorization');
                if (!pass && !token) {
                    // uni.showToast({
                    //     title: '请先登录',
                    //     icon: 'error'
                    // })
                    uni.redirectTo({
                        url: "/pages/common/login/login"
                    })
                    return false
                }
                return e
            },
            fail(err) { // 失败回调拦截
                console.log(err)
            }
        })
    })
}

1、在App.vue下使用:

import routingIntercept from '@/util/permission.js'
export default {
    onLaunch: function() {
        console.warn('当前组件仅支持 uni_modules 目录结构 ,请升级 HBuilderX 到 3.1.0 版本以上!');
        console.log('App Launch');
        // 对路由进行统一拦截,实现路由导航守卫 router.beforeEach 功能
        routingIntercept()
    },

2、在main.js下使用:

import routingIntercept from './utils/permission.js'


//对路由进行统一拦截,实现路由导航守卫router.beforeEach功能
routingIntercept()

注意:以上2种使用方式,任选其一即可。

在 Vue 3 中,组件之间的通信是构建应用程序的关键。本指南将介绍 13 种不同的组件通信方法,从最简单到最复杂,帮助你选择最适合你需求的方式。

h21. 父组件向子组件传递数据 (Props)

这是最基本也是最常用的通信方式。父组件通过属性向子组件传递数据。

父组件:

<template>
<child :name="name"></child>
</template>

<script setup>
import { ref } from 'vue'
import Child from './Child.vue'

const name = ref('小明')
</script>

子组件:

<template>
<div>{{ props.name }}</div>
</template>

<script setup>
import { defineProps } from 'vue'

const props = defineProps({
name: {
type: String,
default: '',
},
})
</script>

h22. 子组件向父组件传递数据 (Emit)

子组件可以通过触发事件的方式向父组件传递数据。

子组件:

<template>
<button @click="handleClick">点击我</button>
</template>

<script setup>
import { ref, defineEmits } from 'vue'

const message = ref('来自子组件的问候')
const emits = defineEmits(['greet'])

const handleClick = () => {
emits('greet', message.value)
}
</script>

父组件:

<template>
<child @greet="handleGreet"></child>
</template>

<script setup>
import { ref } from 'vue'
import Child from './Child.vue'

const handleGreet = (message) => {
console.log(message) // 输出: "来自子组件的问候"
}
</script>

h23. 兄弟组件通信 (Mitt)

对于兄弟组件之间的通信,我们可以使用第三方库 mitt 来实现一个简单的事件总线。

首先,安装 mitt:

npm install --save mitt

然后,在 main.js 中全局配置:

import { createApp } from 'vue'
import mitt from 'mitt'
import App from './App.vue'

const app = createApp(App)
app.config.globalProperties.$bus = mitt()

app.mount('#app')

发送事件的组件:

<script setup>
import { getCurrentInstance } from 'vue'

const { proxy } = getCurrentInstance()
const sendMessage = () => {
proxy.$bus.emit('myEvent', '你好,兄弟')
}
</script>

接收事件的组件:

<script setup>
import { onMounted, getCurrentInstance } from 'vue'

const { proxy } = getCurrentInstance()

onMounted(() => {
proxy.$bus.on('myEvent', (message) => {
console.log(message) // 输出: "你好,兄弟"
})
})
</script>

h24. 透传 Attributes ($attrs)

$attrs 包含了父组件传递给子组件的所有属性,除了那些已经被 props 或 emits 声明的。

父组件:

<template>
<child name="小明" age="18" hobby="篮球"></child>
</template>

子组件:

<script setup>
import { useAttrs } from 'vue'

const attrs = useAttrs()
console.log(attrs) // { age: "18", hobby: "篮球" }
</script>

h25. 模板引用 (Refs)

通过 ref,父组件可以直接访问子组件的属性和方法。

父组件:

<template>
<child ref="childRef"></child>
<button @click="callChildMethod">调用子组件方法</button>
</template>

<script setup>
import { ref } from 'vue'
import Child from './Child.vue'

const childRef = ref(null)

const callChildMethod = () => {
childRef.value.someMethod()
}
</script>

子组件:

<script setup>
import { defineExpose } from 'vue'

const someMethod = () => {
console.log('子组件方法被调用了')
}

defineExpose({
someMethod,
})
</script>

h26. 双向绑定 (v-model)

v-model 提供了一种简洁的方式来实现父子组件之间的双向数据绑定。

父组件:

<template>
<child v-model:name="name"></child>
</template>

<script setup>
import { ref } from 'vue'
import Child from './Child.vue'

const name = ref('小明')
</script>

子组件:

<template>
<input :value="name" @input="updateName" />
</template>

<script setup>
import { defineProps, defineEmits } from 'vue'

const props = defineProps(['name'])
const emit = defineEmits(['update:name'])

const updateName = (e) => {
emit('update:name', e.target.value)
}
</script>

h27. 依赖注入 (Provide/Inject)

provide 和 inject 允许祖先组件向所有子孙组件传递数据,而不需要通过每一层组件手动传递。

祖先组件:

<script setup>
import { provide, ref } from 'vue'

const themeColor = ref('blue')
provide('theme', themeColor)
</script>

子孙组件:

<script setup>
import { inject } from 'vue'

const theme = inject('theme')
console.log(theme.value) // 'blue'
</script>

h28. 路由传参

Vue Router 提供了多种方式在路由之间传递参数。

通过 query 传参:

import { useRouter } from 'vue-router'

const router = useRouter()
router.push({ path: '/user', query: { id: 123 } })

// 在目标组件中
import { useRoute } from 'vue-router'

const route = useRoute()
console.log(route.query.id) // 123

h29. Vuex 状态管理

Vuex 是 Vue 的官方状态管理库,适用于大型应用。

// store/index.js
import { createStore } from 'vuex'

export default createStore({
state: {
count: 0,
},
mutations: {
increment(state) {
state.count++
},
},
})

// 在组件中使用
import { useStore } from 'vuex'

const store = useStore()
console.log(store.state.count)
store.commit('increment')

h210. Pinia 状态管理

Pinia 是新一代的 Vue 状态管理库,提供更简单的 API 和更好的 TypeScript 支持。

// stores/counter.js
import { defineStore } from 'pinia'

export const useCounterStore = defineStore('counter', {
state: () => ({ count: 0 }),
actions: {
increment() {
this.count++
},
},
})

// 在组件中使用
import { useCounterStore } from '@/stores/counter'

const counter = useCounterStore()
console.log(counter.count)
counter.increment()

h211. 浏览器存储

localStorage 和 sessionStorage 可以用于在不同页面或组件之间共享数据。

// 存储数据
localStorage.setItem('user', JSON.stringify({ name: '小明', age: 18 }))

// 读取数据
const user = JSON.parse(localStorage.getItem('user'))

h212. Window 对象

虽然不推荐,但在某些场景下,可以使用 window 对象在全局范围内共享数据。

// 设置全局数据
window.globalData = { message: '全局消息' }

// 在任何地方使用
console.log(window.globalData.message)

h213. 全局属性

Vue 3 提供了 app.config.globalProperties 来替代 Vue 2 中的 Vue.prototype,用于添加全局可用的属性。

// main.js
const app = createApp(App)
app.config.globalProperties.$http = axios

// 在组件中使用
import { getCurrentInstance } from 'vue'

const { proxy } = getCurrentInstance()
proxy.$http.get('/api/data')

h2总结

这 13 种方法涵盖了 Vue 3 中几乎所有的组件通信场景。根据你的具体需求和应用规模,选择最合适的通信方式。记住,好的组件设计能够简化通信,提高代码的可维护性。

转自:传送门

uniapp(类微信小程序)生命周期函数如下,从dcloudio/uni-app导入。

onLoad
onShow
onReady
onHide
onUnload
onPullDownRefresh
onReachBottom


vue3组合式生命周期函数如下,从vue导入。

onMounted()
onUpdated()
onUnmounted()
onBeforeMount()
onBeforeUpdate()
onBeforeUnmount()
onErrorCaptured()
onRenderTracked()
onRenderTriggered()
onActivated()
onDeactivated()
onServerPrefetch()