liziyu 发布的文章

第一步:

习惯将CDN文件下载到本地,保存至静态目录中,注意保留版本号。

<!-- 引入 css -->
<link href="https://cdn.jsdelivr.net/npm/@wangeditor/editor@latest/dist/css/style.css" rel="stylesheet">
<!-- 引入 js -->
<script src="https://cdn.jsdelivr.net/npm/@wangeditor/editor@latest/dist/index.min.js"></script>

第二步:

直接上 HTML代码吧:

<div class="layui-row">
            <div class="layui-col-md12">
                <div class="layui-form-item">
                    <label class="layui-form-label">正文:</label>
                    <div class="layui-input-block">
                        <textarea name="content" id="content" style="display: none"></textarea>
                        <div id="toolbar-container"></div>
                        <div id="editor-container" style="height: 300px;border:1px solid #dddddd"></div>
                    </div>
                </div>
            </div>
        </div>


第三步:

注意从官方拷贝js代码时,要注意javascript与typescript的修改。
直接上 JS代码。

// 渲染富文本编辑器
const { createEditor, createToolbar } = window.wangEditor;
// 编辑器配置
const editorConfig = {MENU_CONF: {}};
// 图片上传
editorConfig.MENU_CONF['uploadImage'] = {
    // 表单字段名称
    fieldName: 'file',
    // 单个文件的最大体积限制,默认为 2M
    maxFileSize: 5 * 1024 * 1024, // 5M
    // 最多可上传几个文件,默认为 100
    maxNumberOfFiles: 5,
    // 选择文件时的类型限制,默认为 ['image/*'] 。如不想限制,则设置为 []
    allowedFileTypes: ['image/*'],
    // 小于该值就插入 base64 格式(而不上传),默认为 0
    base64LimitSize: 5 * 1024, // 5kb
    // 自定义参数
    meta: {
        from: 'editor', //标志是从编辑器上传
    },
    // 上传图片的配置
    server: '<?=route("upload.image")?>',
};
// 默认提示文字
editorConfig.placeholder = '请输入内容'
editorConfig.onChange = (editor) => {
    // 当编辑器选区、内容变化时,即触发
    //console.log('content', editor.children)
    //console.log('html', editor.getHtml())
    document.getElementById('content').value = editor.getHtml();
}


// 工具栏配置
const toolbarConfig = {}

// 创建编辑器
const editor = createEditor({
    html: document.getElementById('content').value,
    selector: '#editor-container',
    config: editorConfig,
    mode: 'simple' // 或 'simple' 参考下文
})
// 创建工具栏
const toolbar = createToolbar({
    editor,
    selector: '#toolbar-container',
    config: toolbarConfig,
    mode: 'simple' // 或 'simple' 参考下文
})

最后:

截图如下。
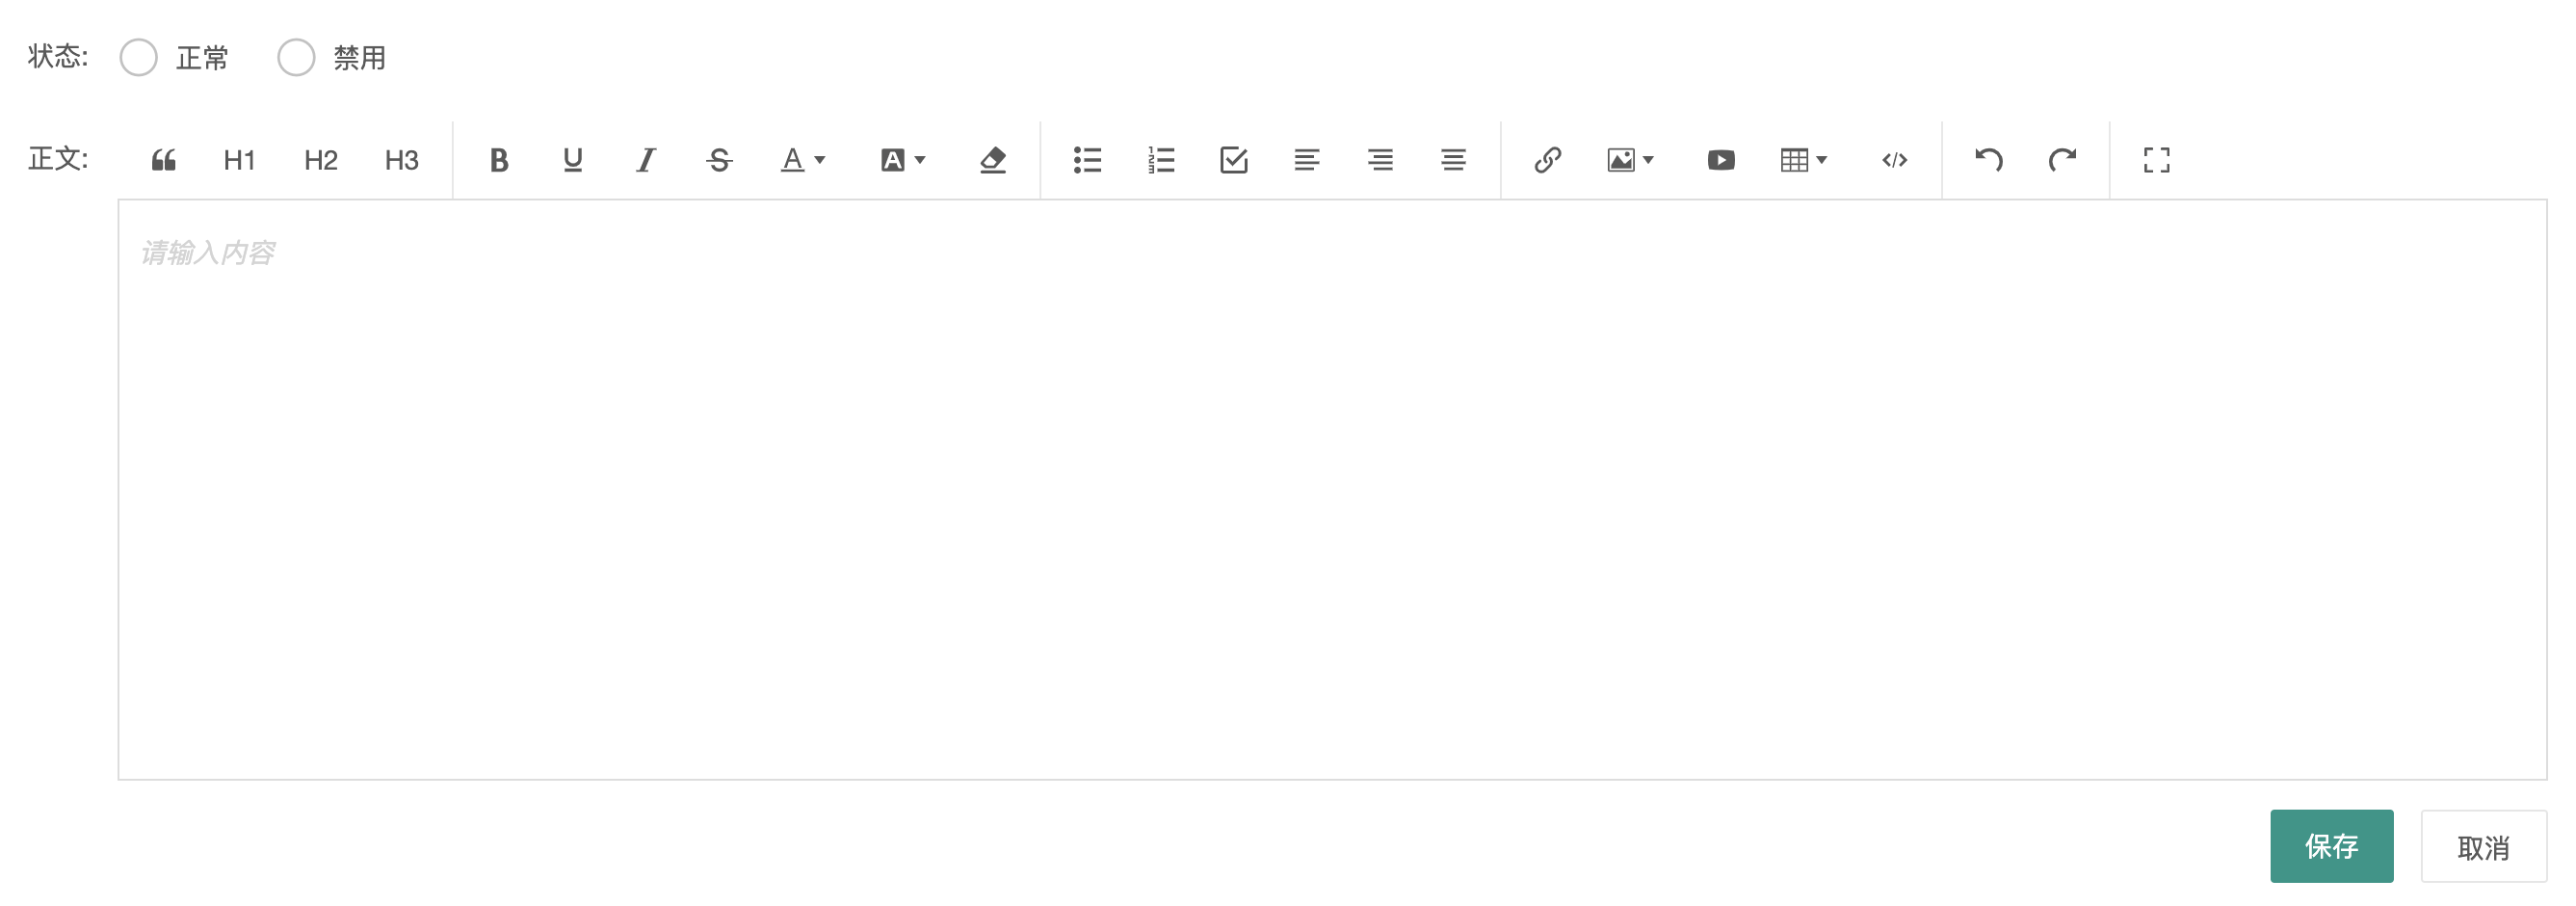
333333.png

  1. toLocaleString(),当数字是四位数及以上时,从右往左数,每三位用分号隔开,并且小数点后只保留三位;而toString()单纯将数字转换为字符串。
  2. toLocaleString(),当目标是标准时间格式时,输出简洁年月日,时分秒;而toString()输出国际表述字符串。
var num = new Number(1777.123488); 
console.log(num.toLocaleString());  // 输出:1,777.123
console.log(num.toString());  // 输出:1777.123488

var dateStr = new Date();
console.log(dateStr.toLocaleString());  // 输出:2022/2/15 16:48:35
console.log(dateStr.toString());  // 输出:Tue Feb 15 2022 16:48:58 GMT+0800 (中国标准时间)

元组类型用来表示已知元素数量和类型的数组,各元素的类型不必相同,对应位置的类型需要相同。

let x: [a:string, b:number];
x = ['abc', 100] //okay
x = [12, 'hello']; //error
console.log(x[0]); //abc

当接口继承了一个类类型时,它会继承类的成员但不包括其实现。 就好像接口声明了所有类中存在的成员,但并没有提供具体实现一样。 接口同样会继承到类的private和protected成员。 这意味着当你创建了一个接口继承了一个拥有私有或受保护的成员的类时,这个接口类型只能被这个类或其子类所实现(implement)。

什么是笛卡尔积

笛卡尔乘积是指在数学中,两个集合 X 和 Y 的笛卡尔积(Cartesian product),又称直积,表示为 X×Y,第一个对象是 X 的成员而第二个对象是 Y 的所有可能有序对的其中一个成员。
假设集合 A={a, b},集合 B={0, 1, 2},则两个集合的笛卡尔积为 {(a, 0), (a, 1), (a, 2), (b, 0), (b, 1), (b, 2)}。

商品 SKU 计算

public function test()
{
    $arr = array(array(1,3,4,5),array(3,5,7,9),array(76,6,1,0));

    $cartesian_product = $this->cartesian($arr, []);
    print_r($cartesian_product);
}

/**
 ** 实现二维数组的笛卡尔积组合
 ** $arr 要进行笛卡尔积的二维数组
 ** $str 最终实现的笛卡尔积组合,可不写
 ** @return array
 **/
protected function cartesian($arr,$str = [])
   {
    //去除第一个元素
    $first = array_shift($arr);
    //判断是否是第一次进行拼接
    if(count($str) > 1) {
        foreach ($str as $k => $val) {
            foreach ($first as $key => $value) {
                //最终实现的格式 1,3,76
                //可根据具体需求进行变更
                $str2[] = $val.','.$value;
            }
        }
    }else{
        foreach ($first as $key => $value) {
            //最终实现的格式 1,3,76
            //可根据具体需求进行变更
            $str2[] = $value;
        }
    }
    //递归进行拼接
    if(count($arr) > 0){
        $str2 =$this->cartesian($arr,$str2);
    }
    //返回最终笛卡尔积
    return $str2;
}

运行结果

Array
(
    [0] => 1,3,76
    [1] => 1,3,6
    [2] => 1,3,1
    [3] => 1,3,0
    [4] => 1,5,76
    [5] => 1,5,6
    [6] => 1,5,1
    [7] => 1,5,0
    [8] => 1,7,76
    [9] => 1,7,6
    [10] => 1,7,1
    [11] => 1,7,0
    [12] => 1,9,76
    [13] => 1,9,6
    [14] => 1,9,1
    [15] => 1,9,0
    [16] => 3,3,76
    [17] => 3,3,6
    [18] => 3,3,1
    [19] => 3,3,0
    [20] => 3,5,76
    [21] => 3,5,6
    [22] => 3,5,1
    [23] => 3,5,0
    [24] => 3,7,76
    [25] => 3,7,6
    [26] => 3,7,1
    [27] => 3,7,0
    [28] => 3,9,76
    [29] => 3,9,6
    [30] => 3,9,1
    [31] => 3,9,0
    [32] => 4,3,76
    [33] => 4,3,6
    [34] => 4,3,1
    [35] => 4,3,0
    [36] => 4,5,76
    [37] => 4,5,6
    [38] => 4,5,1
    [39] => 4,5,0
    [40] => 4,7,76
    [41] => 4,7,6
    [42] => 4,7,1
    [43] => 4,7,0
    [44] => 4,9,76
    [45] => 4,9,6
    [46] => 4,9,1
    [47] => 4,9,0
    [48] => 5,3,76
    [49] => 5,3,6
    [50] => 5,3,1
    [51] => 5,3,0
    [52] => 5,5,76
    [53] => 5,5,6
    [54] => 5,5,1
    [55] => 5,5,0
    [56] => 5,7,76
    [57] => 5,7,6
    [58] => 5,7,1
    [59] => 5,7,0
    [60] => 5,9,76
    [61] => 5,9,6
    [62] => 5,9,1
    [63] => 5,9,0
)


元组类型:

表示一个已知元素数量和类型的数组,各元素的类型不必相同。 比如,你可以定义一对值分别为stringnumber类型的元组。


// Declare a tuple type
let x: [string, number];
// Initialize it
x = ['hello', 10]; // OK
// Initialize it incorrectly
x = [10, 'hello']; // Error

console.log(x[0].substr(1)); // OK
console.log(x[1].substr(1)); // Error, 'number' does not have 'substr'

x[3] = 'world'; // OK, 字符串可以赋值给(string | number)类型

console.log(x[5].toString()); // OK, 'string' 和 'number' 都有 toString
x[6] = true; // Error, 布尔不是(string | number)类型

1.png
登陆到腾讯云主机管理面板,在“防火墙”里放行redis用到的端口,允许通行状态。

2.png
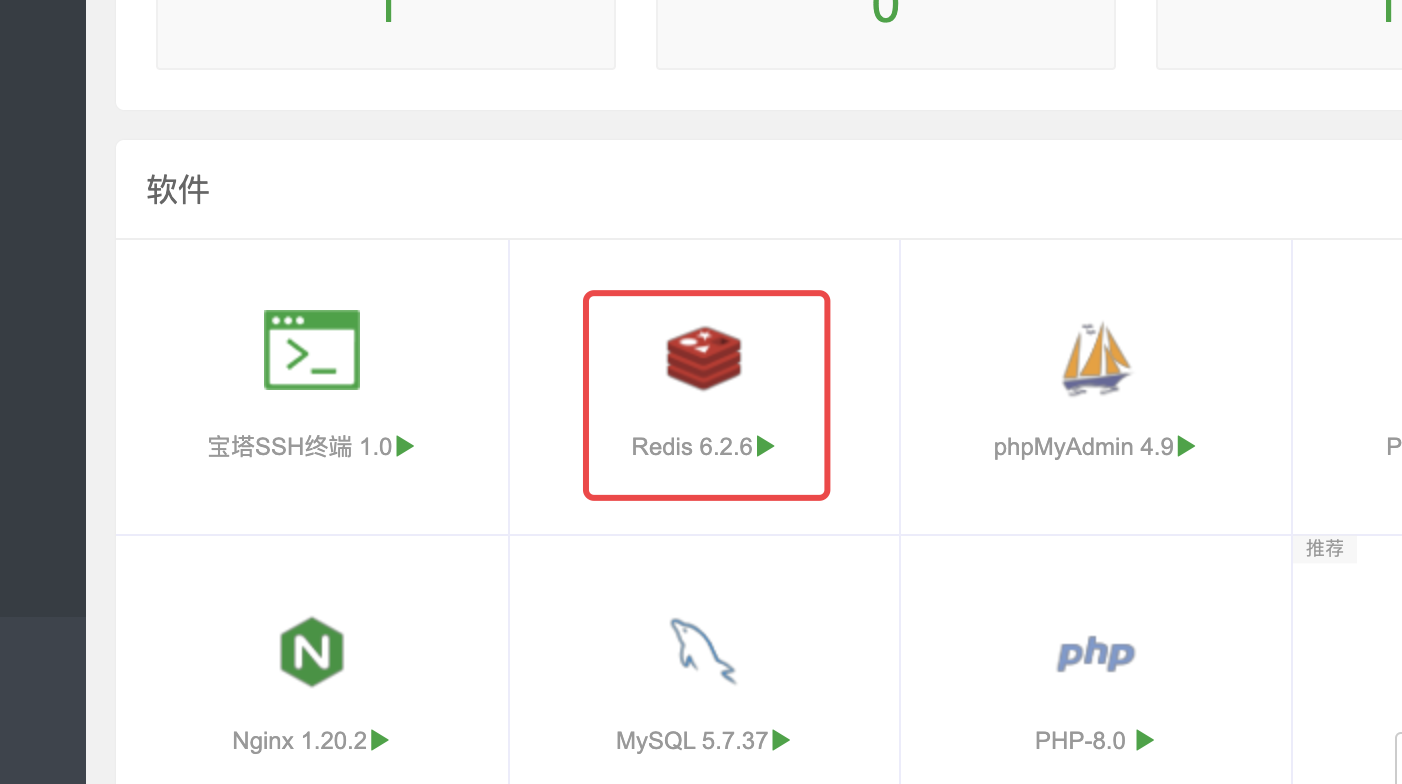
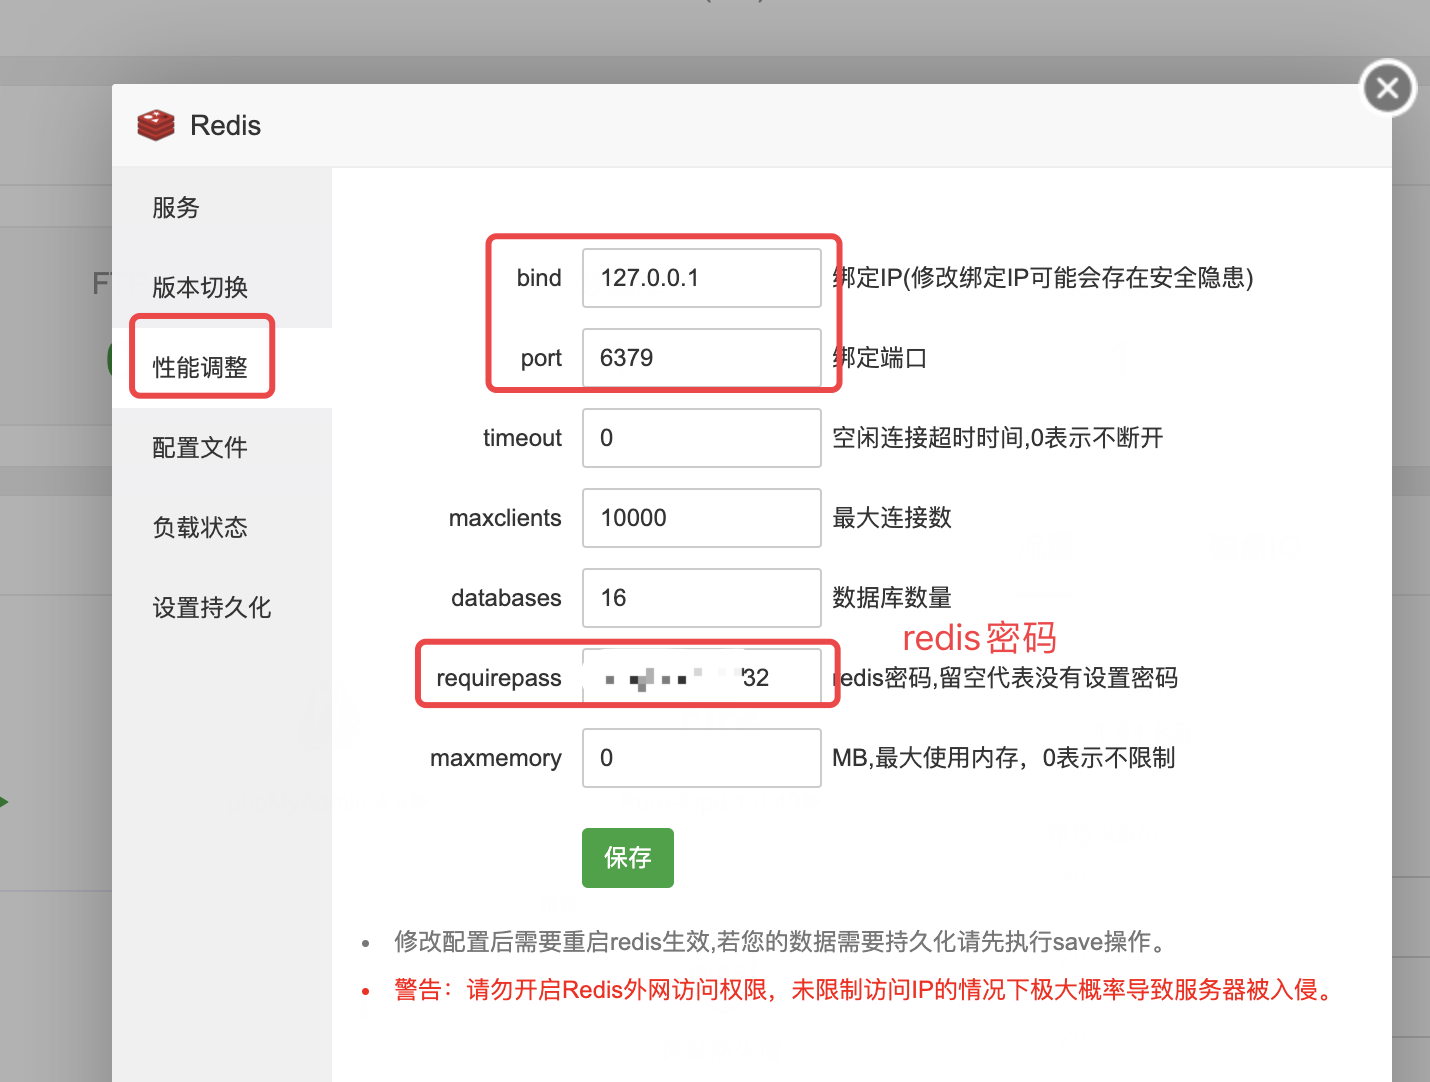
进入宝塔控制面板(非宝塔环境同理)找到rdids管理面板,单击进入如下界面。

3.png
上图中的ip与端口基本不用动,需要注意的是端口要一致,这里要设置一个管理密码,密码在下面会用到。

4.png
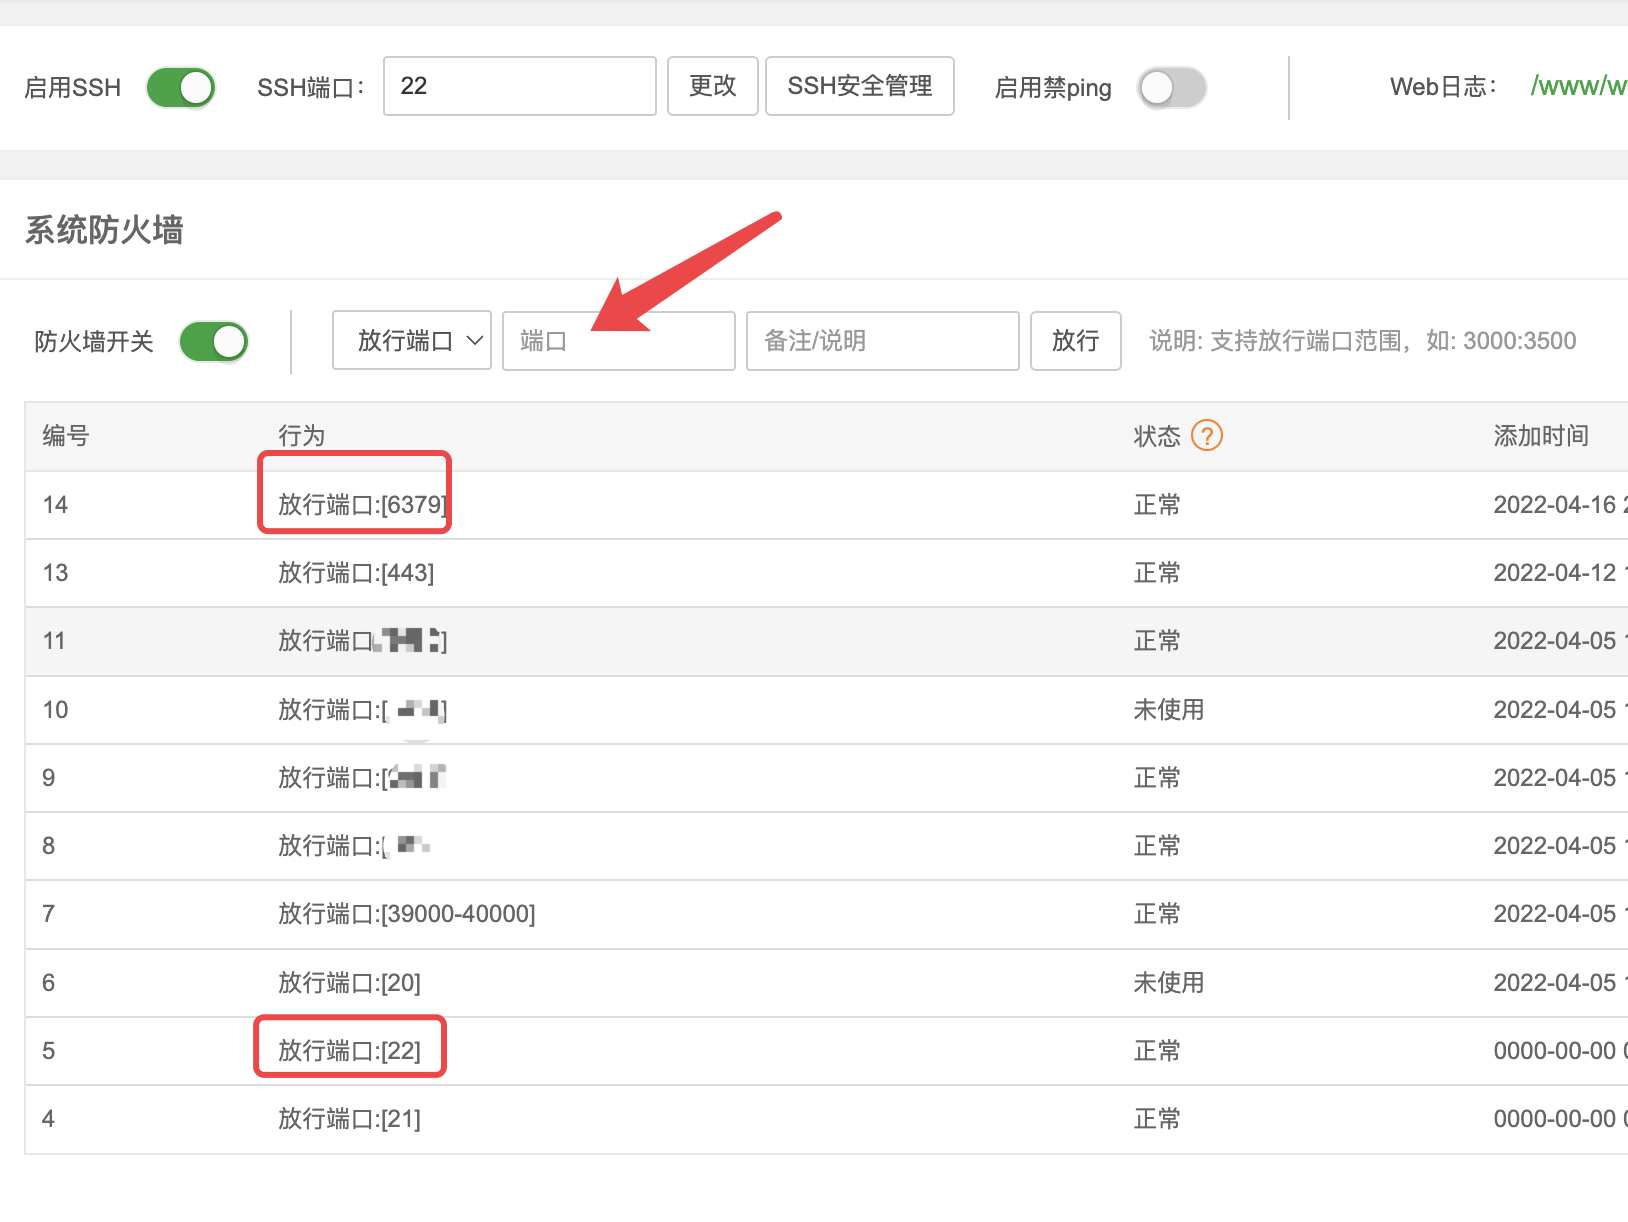
在宝塔的管理面板,将上面redis用到的端口(6379)放行,同时将SSH端口(22)放行。

5.png
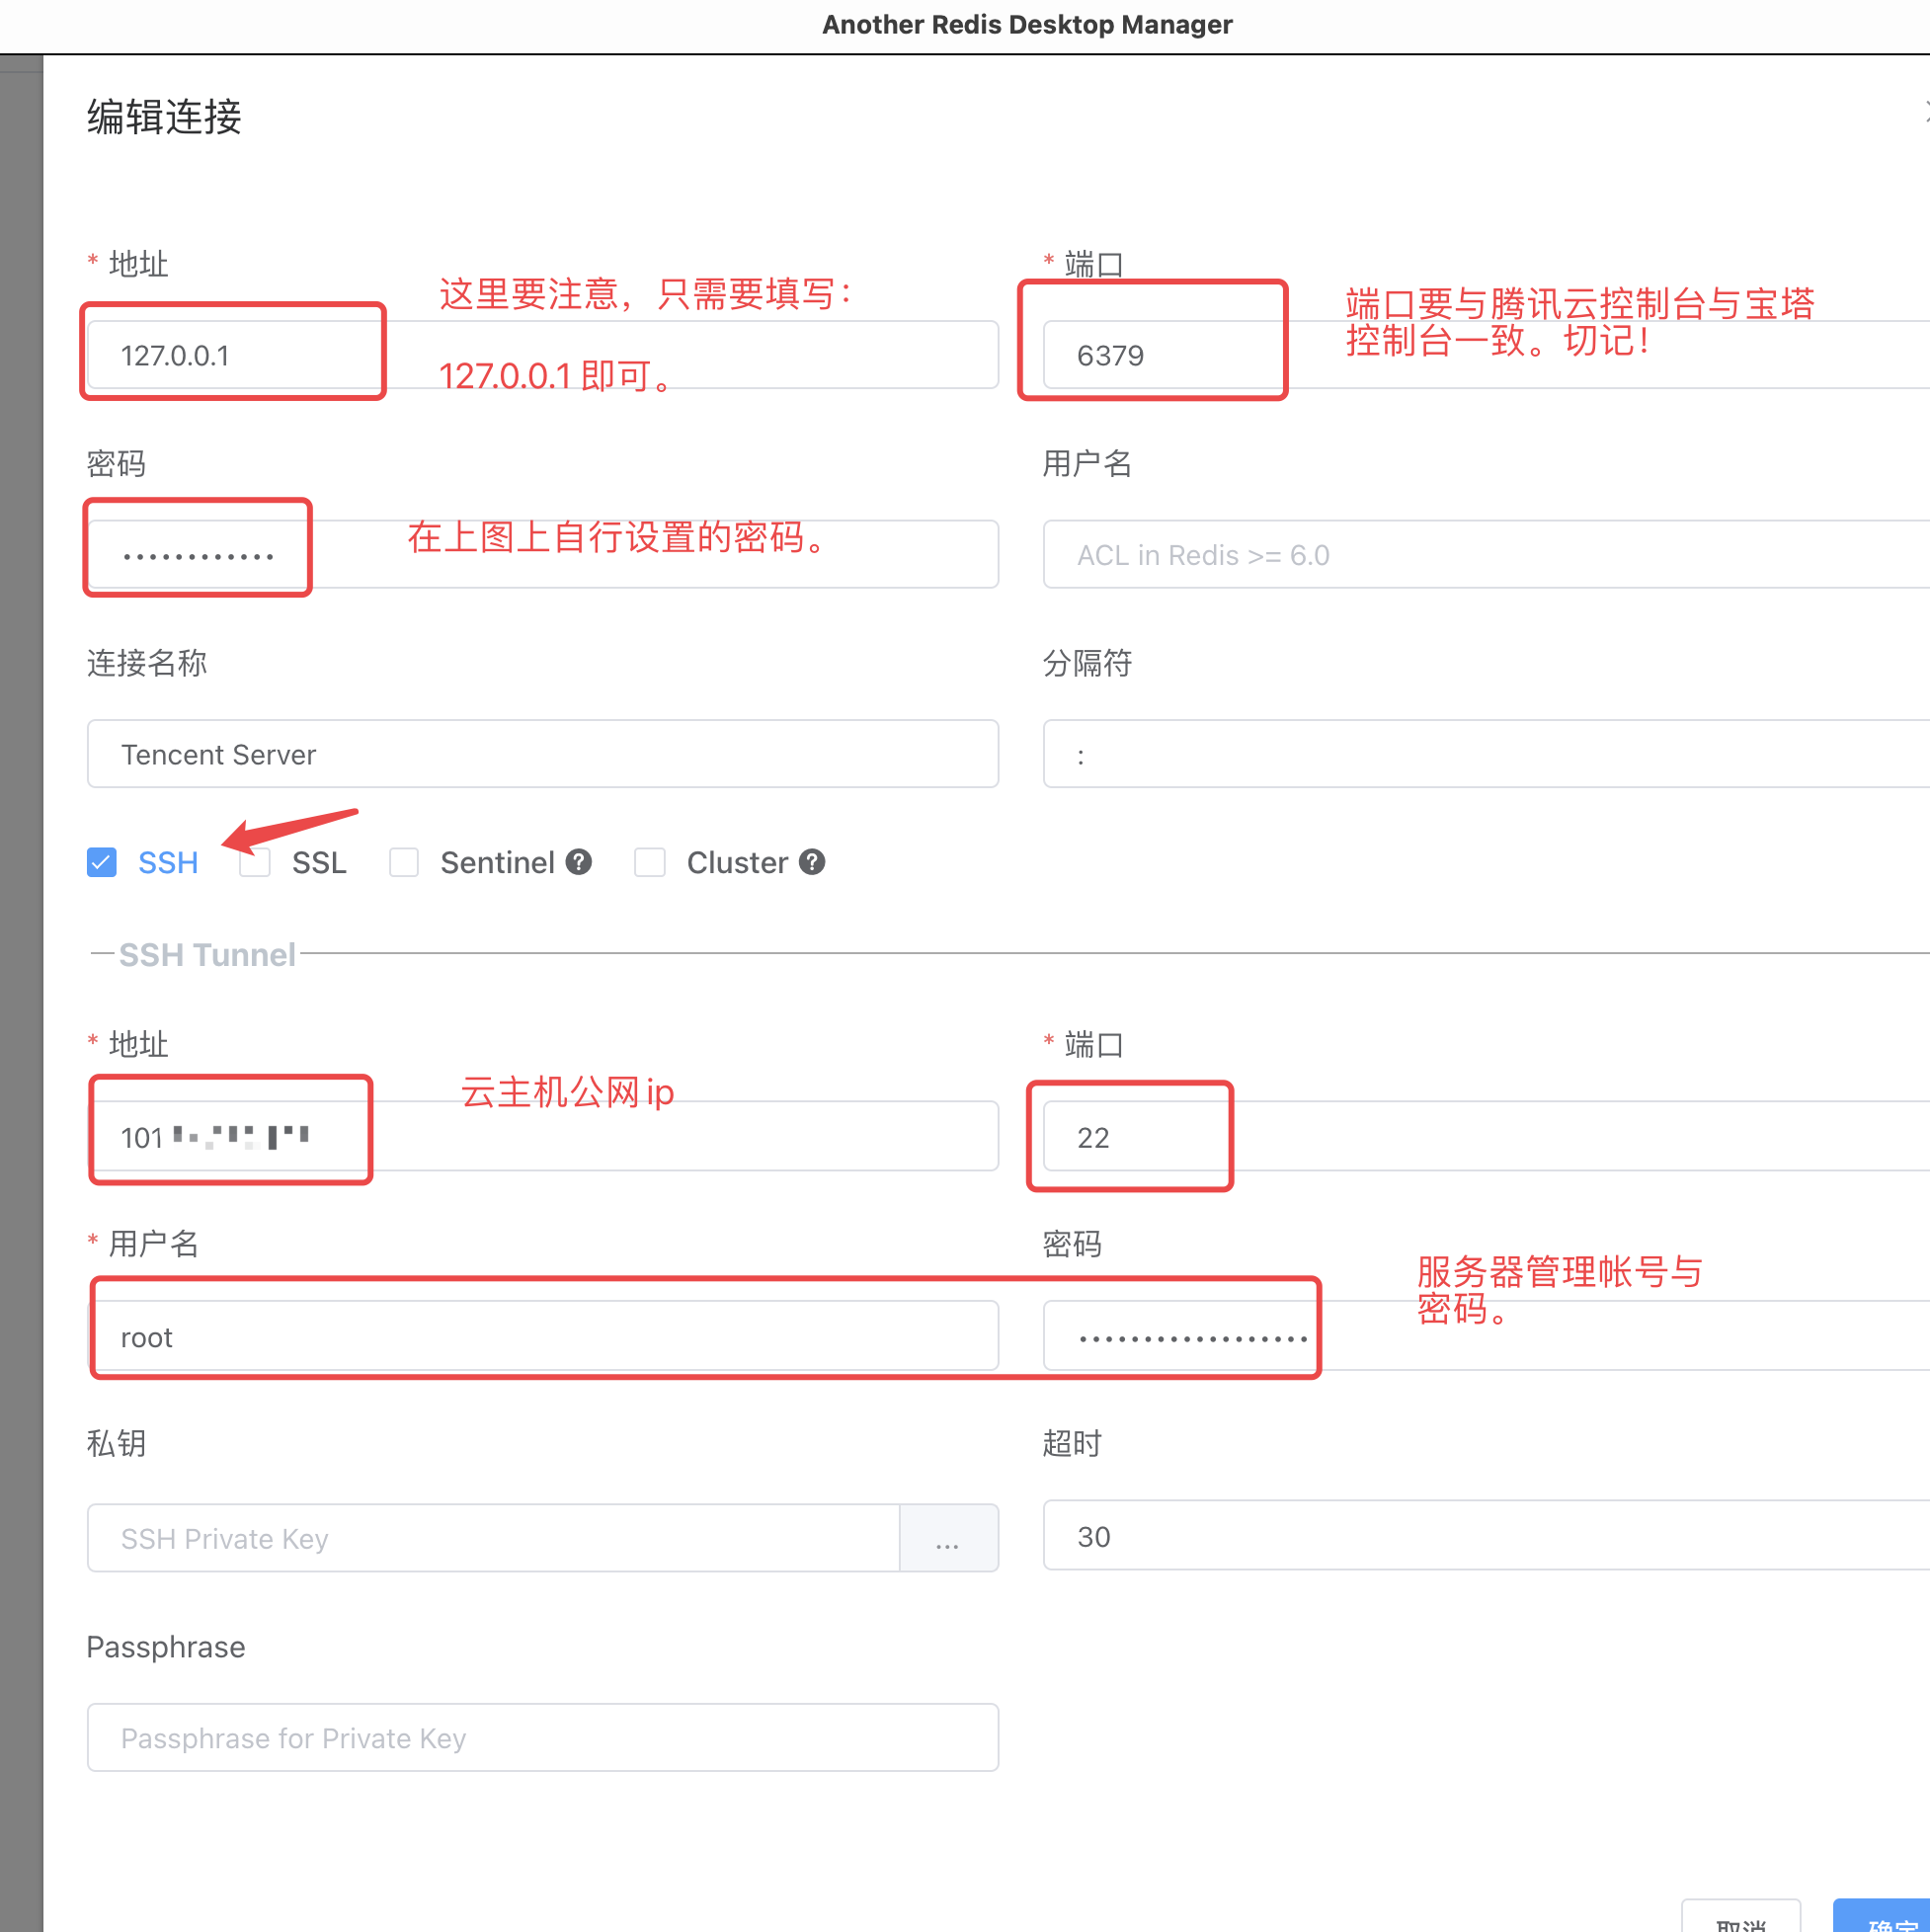
打开本地redis客户端,根据上图进行填写即可,需要注意的是,两处IP地址要注意,特别是:127.0.0.1这里基本不用动的,只需要修改其它参数即可。

6.png
出现上图,即说明成功链接,可本地可视管理了。